Reference Readings
Concept of Users and Groups
Many
computing systems and applications have a concept of users and groups.
This is a very good feature of a system as it enables tight control over
who can do what and it provides an ability to make an audit trail of
all the actions taken by users, in other words a track record of who did
what. This is useful to identify the root of problems and security
breaches for example. Everybody accessing the system should have their
own identify which is most of the time referred to as a user. Often users are similar in nature and therefore are grouped together in groups to simplify various administrative tasks.
Roles and Permissions
As mentioned in the previous section, it is very important to have the ability to define permissions on resources, actions and services of computer applications. The purpose for this is to keep the system is the best possible working order and keep it as secure as possible. For example, the permissions to do anything on a computer system in the hands of someone without the required background knowledge could be absolutely disastrous. Some actions could leave the system vulnerable, or worse could completely destroy it. The best way to reduce risk of problems arising from users is to only give them access to what they are ready for. This is done through assigning permissions. The approach of assigning permissions will vary greatly among system and this advanced topic is better left to people with a fairly deep understanding of how computer systems work. Roles are simply a set of permissions grouped into a template for later use. For example, a role of supervisor would have permissions of it own which would be entirely different from the permissions of the role of a student. Some simpler systems do not include roles and permission templates are done directly on groups.
Creating New Users
One of the disadvantages of systems with users is that the more system you use (a website system, the operating system, a wiki system, a school database, etc.) it can quickly become very difficult, messy and annoying to manage all the user accounts everywhere, especially when there are many users (for example, more then 10). It gets hard for the users too who have to manage a larger set of identity.
There are centralised user management systems out there that attempt to address this problem. The UAP Gateway and Server has a centralised user system called Samba4 configured in Active Directory mode which is a free version of Microsoft Active Directory Server. The choice of Active Directory as the centralised management system is largely due to it being the most widely used in the world with the widest support in computer applications. Unfortunately, not all applications can effectively speak to an Active Directory and therefore in those cases it become necessary to manage users separately in their own application. Here we are concern with the management of users in the central directory of users which will effectively manage users for your in all of the following applications and services offered on the UAP Gateway and Server:
- Wordpress blog and content management system (the application to build your school website)
- Tiki wiki (the application to collaboratively build a local knowledge base)
- pfSense gateway (the system used as router, firewall, DHCP server, DNS server, Captive Portal and various other technical services not often directly used by users)
- ownCloud cloud storage (the centralised file storage and file sharing system)
- Moodle course management system (a local course management system you may wish to adopt)
- SchoolTool school information system
Create user on Linux command line with samba-tool
You will need to login uap-server.uapcommunity.gov.vu as user supervisor. Unless you are an expert with already a secure access to the system you will need do this directly from the UAP Gateway and Server with a display and keyboard connected to it. First login the uap-ve.uacommunity.gov.vu with the supervisor credentials then securely login uap-server.uapcommunity.gov.vusupervisor@uap-ve$ ssh uap-server.uapcommunity.gov.vu
supervisor@uap-server$
Then you can first list existing users to see if new user is already in there. You will see something like this quite possible with many more users.
supervisor@uap-server$ sudo samba-tool user listAdding a new one should be done exactly like this. Any mistake will not be forgiven by the computer and will not work as expected.
jaytimbasal
ghachey
supervisor
pfsense
Administrator
dleeming
visitor
jlenon
krbtgt
Guest
supervisor@uap-server$ sudo samba-tool user create ejohn SomePassword --given-name=Elton --surname=John --mail-address=user@email.comNow this user is in the centralised user system and can later be given permissions for various applications on the UAP Gateway and Server.
Everybody connecting to anything on the network should have their own user account that uniquely identifies them. However, there are times that you either forgets his/her password, the users does not have the necessary permissions to achieve a task or some other contraints. In those cases there are these default users can be be users though care should be taken and not everyone should be allowed to use the following users.
| User | Relevant System/Application |
Permissions |
|---|---|---|
| root | All Linux and FreeBSD operating systems, Proxmox PAM Authentication |
Full administrative privileges of the operating systems. Can do everything including destroying the system with a single command |
| admin | Wordpress, ownCloud, Tiki, Moodle, pfSense, Captive Portal |
Full administrative privilege at the application level (typically local user) |
| Administrator |
Active Directory, Windows that have joined domain, Wordpress, ownCloud, Tiki, Moodle, pfSense, Captive Portal |
Same permission as admin but through Active Directory LDAP binding |
| supervisor | Operating Systems, Wordpress, ownCloud, Tiki, Moodle, pfSense, Captive Portal |
Many privileges necessary to run operations of a UAP Gateway and Server in a rural site |
| visitor |
Captive Portal | Almost no privilges. Can connect to network and use Internet and view free services. |
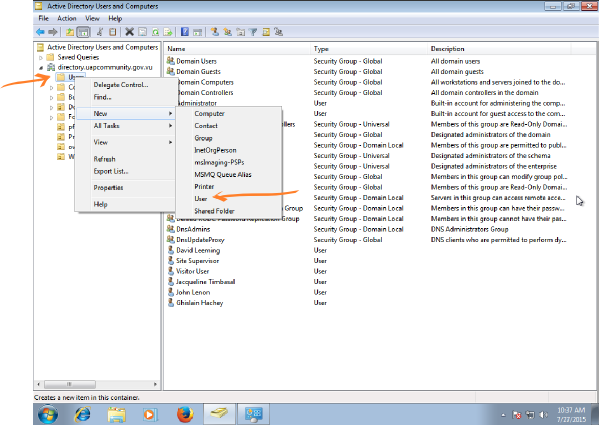
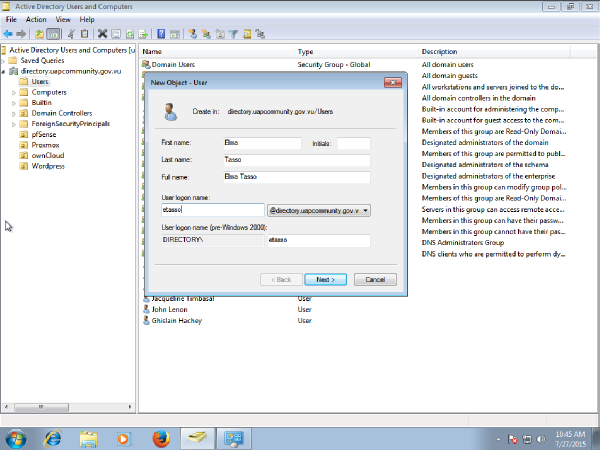
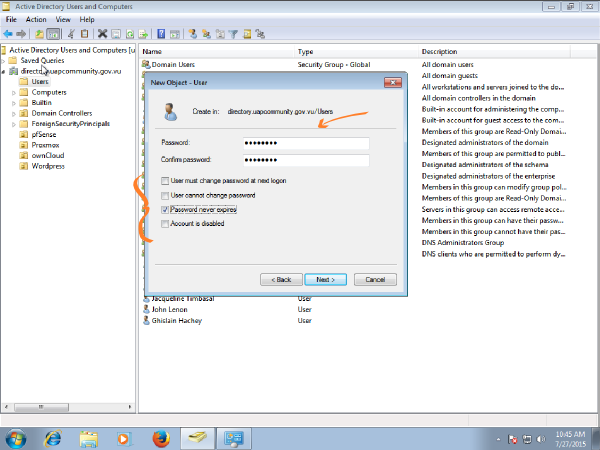
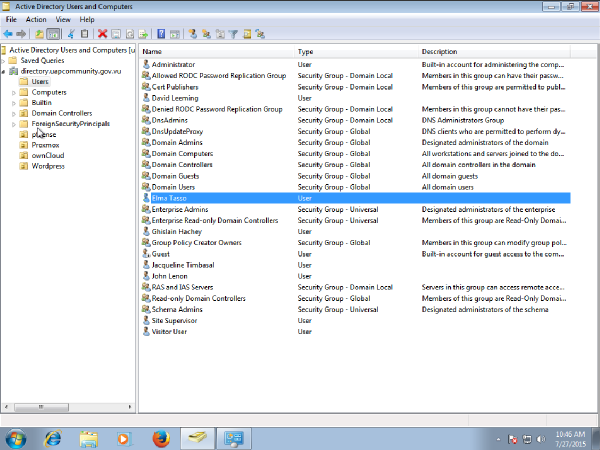
Create user on Windows 7 with RSAT
The requirements for this section are that the Windows PC is joined to the domain and that the RSAT are installed; this process is detailed in a previous topic. Doing this on Windows is more familiar to most network administrators. A lot more options are available too. But we will keep it to the basics here just like we did above.Simply click on Start -> Administrative Tools -> Active Directory Users and Computers to open the following.
Viewing Groups and Group Memberships
Groups are simply a collection of users with similar permissions. A list of all relevant groups on the server will be maintained here
along with the permissions allowed for users on those groups. More
groups can be added later but the following simple set provides a really
good starting point.| Application | Group Name |
Summary of Permissions |
|---|---|---|
| ownCloud | OCAdmins | Meant to be administrators of ownCloud. Currently ownCloud does not
support this so its local admin user would have to be used instead |
| ownCloud | OCStudents | All students with permission to store in their private cloud account and share with others. |
| ownCloud | OCTeachers | All teachers with permission to store in their private cloud account and share with others. |
| ownCloud | OCSupervisors | All site supervisors with permission to store in their private cloud account and share with others. |
| Proxmox | VEBackups | Users with permissions to execute backups of Gateway and Server |
| Proxmox | VEAdmins | Users with with full Administrative privilege on the visualization platform |
| Wordpress |
WPAdmins | Users with all Administrative privileges on the Wordpress system |
| Wordpress | WPSupervisors | Users with enough privileges to run the wordpress website running smoothly with regular maintenance |
| Wordpress | WPEditors | Users with permissions to create and edit web pages. |
| pfSense |
PFAdmins | Users with full Administrative privileges on the Gateway and firewall. Very advanced and destructive things can be done here |
| pfSense |
PFInternetManagers |
Users with privileges to manage access to the Internet such as with an Internet Cafe |
| pfSense |
PFSupervisors |
Users with privileges to do small non-destructive network related maintenance tasks |
Of course, the groups above can also be viewed from the system in a similar way you created users.
Viewing Groups on Linux command line with samba-tool
As long as you are still in uap-server.uapcommunity.gov.vu you could execute the following command to get a list of existing groups. However, the following command will list all groups including many built-in groups normally found in a Microsoft Active Directory Server.supervisor@uap-server$ $ sudo samba-tool group listYou might want to see all members of a group which can be done like follows. For example, in this case we want to see who are the wordpress editors (i.e. members of the WPEditors group).
Allowed RODC Password Replication Group
Enterprise Read-Only Domain Controllers
...(missing windows groups)
WPSupervisors
Administrators
OCSupervisors
PFSupervisors
OCStudents
OCTeachers
WPEditors
WPAdmins
OCAdmins
PFAdmins
VEAdmins
VEBackup
DnsAdmins
Guests
Users
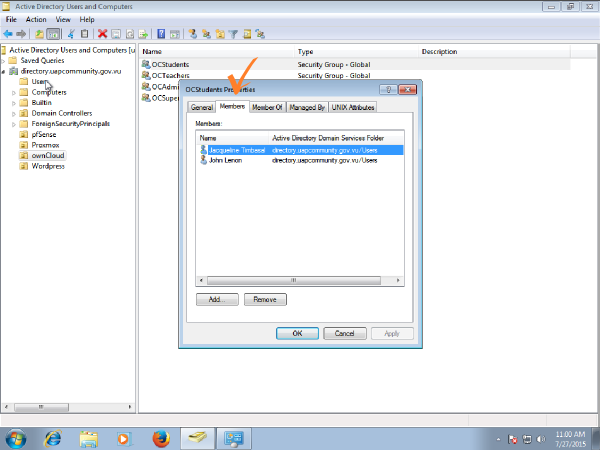
supervisor@uap-server$ sudo samba-tool group listmembers OCStudentsYou can see there are two users in the group OCStudents which is the ownCloud students group.
jaytimbasal
jlenon
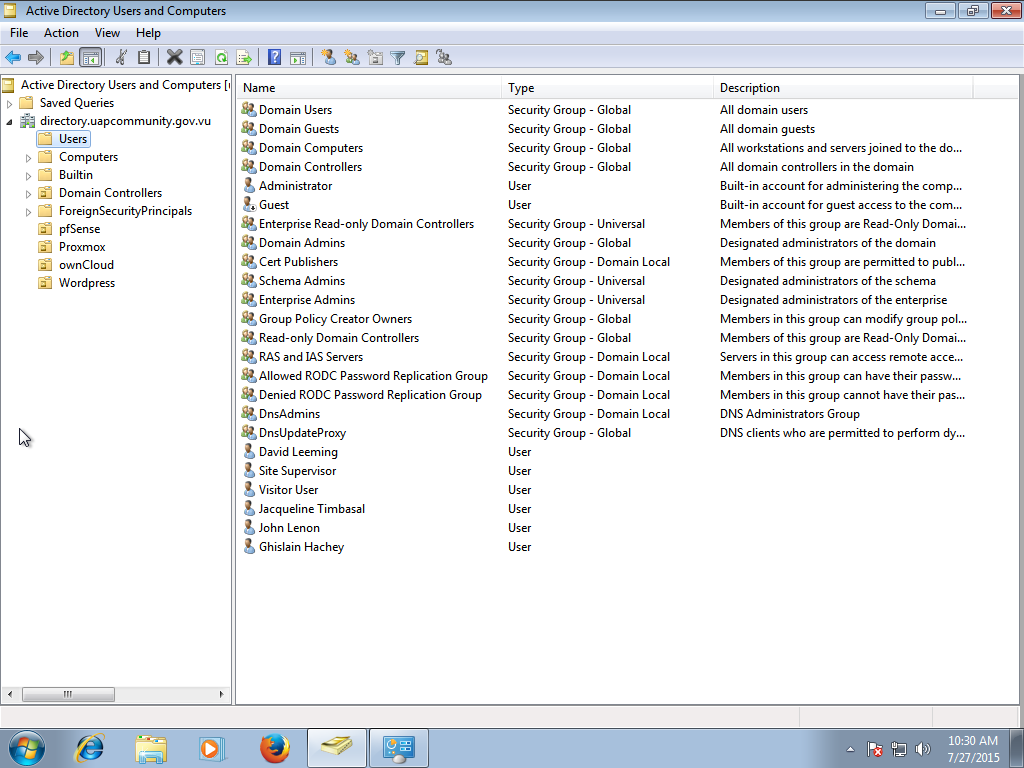
Viewing Groups on Windows 7 with RSAT
Or in Windows by clicking Start -> Administrative Tools -> Active Directory Users and Computers. All the UAP Gateway and Server related groups are typically found in their respective Organizational Units. For example, groups related to ownCloud would be in the ownCloud Organizational Unit, groups related to the Wordpress websites would be in the Wordpress Organizational Unit, etc. You should be able to easily browse them as shown in the following illustration.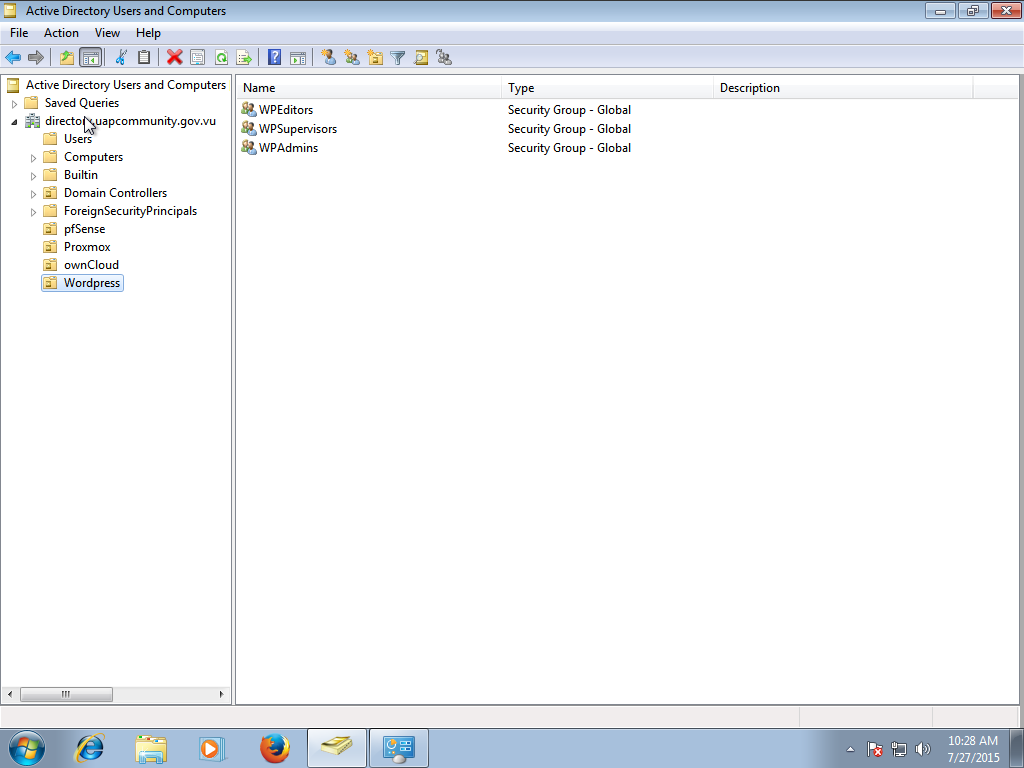
Adding Permissions and Roles to Users
Creating users as done earlier is only part of the story. They will automatically have access to the network and be able to use the Internet but not much more. You might want to assign users as website editors or provide them with their own ownCloud account as students or teachers. The way to achieve this on the UAP Gateway and Server is to add them to specific groups.Let's say for example you added a new user called Elton John. Elton is a student with a keen interest for writing and was assigned writing web pages on a school website. Maybe all students will be writing pages on the website, in which case all students could be added to the group. Since the website is powered by Wordpress you would need to add Elton to one of the Wordpress groups. Refer wordpress groups above, there are only a few groups but you must use the correct one. Just adding web pages can be done using the WPEditors group. As usual there are a few ways to do this.
Adding User to Group on Linux command line with samba-tool
You can add Elton to the editors group with the following command.supervisor@uap-server$ sudo samba-tool group addmembers WPEditors ejohnThis will add Elton John to the WPEditors group. You can see this with the following command.
Added members to group WPEditors
supervisor@uap-server$ sudo samba-tool group listmembers WPEditorsUser Elton John can now login wordpress and edit pages on the school website.
jlenon
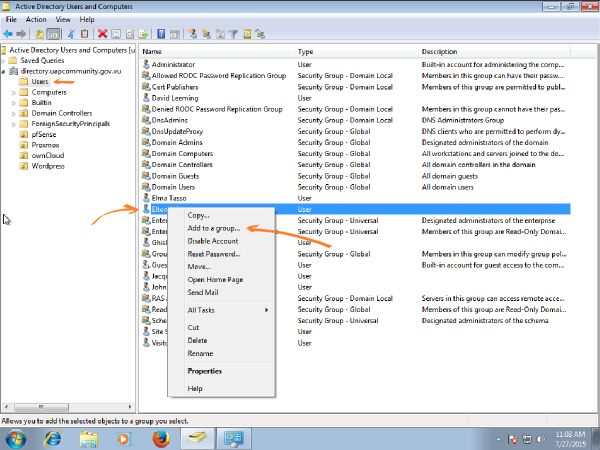
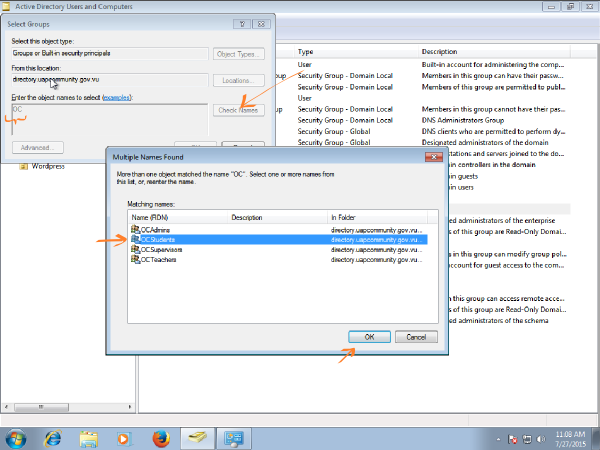
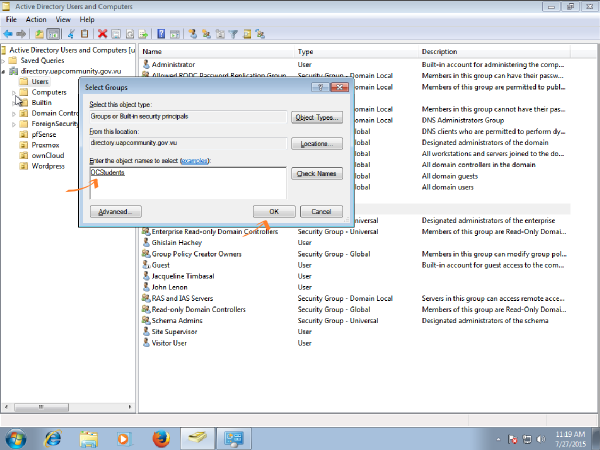
Adding User to Group on Windows 7 with RSAT
Or in Windows by clicking Start -> Administrative Tools -> Active Directory Users and Computer. Elton John above is not just a website editor, he happens to be a student who could be given a ownCloud student account. There are a couple of ways this could be done on Windows. Once is to open the OCStudents group and add the user as a member. Here we will add the group from within the user. Find the user Elton John in the Users. and right click to see the following illustration. You can click on Add to a group.